Pages

Showing posts with label cushions. Show all posts

Friday, February 20, 2015

A Good Friend

my sewing machine jammed yesterday I cannot fix the problem so I need to take it to someone for repairs and it feels like I am losing a good friend hopefully only for a short while. however before it died I did make some thing like this cushion and doll. I was in the middle of making the dolls dress when the said incident occurred.

Saturday, February 14, 2015

Friday, January 09, 2015

Happy New Year

we had snow early this week and freezing temperatures. Its cold and colourless outside. so I have made two cushions that will certainly add colour and a little warmth to my sofa. the fabric is from Joann's by Jules and Coco in speckles orange, zig-zag and pink floral. I used a fun pompom trim for the rectangular accent cushion and piping for the large square cushion

Wednesday, December 03, 2014

White and Blue Cushion with Embroidery

A couple of weeks ago I signed up for the Penguin and Fish news letter and in return I received a lovely  picnic pals embroidery pattern. I used the pattern on this cushion cover slightly larger than the original. The cushion measures approximately 12 x 16 inches.

Friday, November 07, 2014

Corded Fabric

More playing and experimenting this time with a technique known as cording. The type of cording I am referring to here places a cord or yarn inside a stitched channel, this creates a raises fabric surface. Coding can be done by hand or machine. I am not a very patient person so naturally I used my sewing machine. A twin needle is essential to create the stitched channel which holds the cord or yarn.
How its done. place cord under fabric (I used acrylic yarn in my cushion), stitch on the right side of fabric, use fingers to guide cord making sure its centered between the twin needles, and experiment with straight lines, wavy lines, spiral patterns. The possibilities are only limited by your imagination!
Another way to cord is to sandwich the cord between two pieces of fabric. cording will reduce the size of your fabric so always start with a larger piece.

Friday, October 31, 2014

Inspiration

The idea for this cushion cover popped into my head during my yoga class last week. It a variation on the work I have been doing recently on fabric gathering but simplified. This got me thinking about inspiration and new ideas.
Where does it come from and how can we tap into it everyday. Over the years I have read many books on this subject and the most commonly mentioned point is to just get started with a project and ideas will slowly began to flow for new work. Keeping a sketchbook of ideas is also invaluable.
Personally I have noticed that ideas will come to me when I am not actively thinking about my work like during yoga last week.
Sigmund Freud once said "When inspiration doesn't come, I go halfway to meet it"
Where or how do you find inspiration?

Friday, October 24, 2014

This week

This week I have been working on Christmas themed cushions. If you like what you see visit my shop.

Friday, October 10, 2014

I remember

It was Grandparents week at my children's school the week which made me reflect on my wonderful grandparents. The bench  in the above picture sits in my mudroom, the cushions on the bench  were made a long time ago by my grandmothers.
My grandmothers were friends who often worked on the same projects. My paternal grandmother was very skilled with a embroidery needle and the work on the front of the cushion was done by her. My maternal grandmother would create pure magic with a crochet needle the trim around each cushion was done by her.
Both grandmothers were always busy making something. the something was always an item for the home, a table cloth , a cushion or tea towel.
 I remember my grandmother telling me that the project she was working on was for me for when I grew up and had a home of my own I could display the item and remember her. This of course made little sense to me at the time but today when I see the cushions in my mudroom I remember- my grandmothers made those cushions for me.

Friday, September 26, 2014

Frilled Cushion

Adding a frill to a cushion cover gives it a soft feminine look. A frill trim need not be restricted to floral fabric.
To make the frill you will need to measure the cushions perimeter and add a seam allowance of about 5cm (2inches) and double it. Decide if you would like a long or short frill for the width and double that figure also. Cut strips of fabric  that measure the length and width you have calculated, joining strips if needed. Fold the strip in half on the short side (width) wrong sides together. Using the longest stitch length on your machine tack the folded strip on the raw edge. To gather pull the threads. The gathered frill should measure half the original length. Attach to cushion front the same way you would any other trim.

Monday, September 08, 2014

Friday, September 05, 2014

Patchwork Cushion Cover


This is a good project to make with fabric left over from other projects.
 

Materials needed

one 12in zipper
17in striped fabric
5in navy fabric
8in floral fabric
Finished size 16in square pillow

Instructions

Cut  the following-for the front one 7in square from floral fabric, two 7in x 2 in from navy fabric, two 10in x 2 in from navy fabric, two 9 ½ in x 4 in from striped fabric and two 16 ½  x 4 in from striped fabric. For the back cut one 16in square from striped fabric.

Sew the 7in navy strips to the top and bottom of the floral square. Follow this by sewing the 10in navy strips to the sides of the floral square. The square should now be framed by the navy fabric and measure 9inches.

Next repeat the same steps with the striped fabric. Sew the shorter strips to the top and bottom and the longer strips to the sides. The square should now measure 16inches.

To attach the zipper place the front and back pieces together with right sides facing centre the zipper on the bottom raw edge measure the zipper  pin and stitch a 1in seam leaving the section were the zipper will be unstitched. Tack the zipper opening closed. Place the zipper face down on the zip seam tack into place. Using a zipper foot stitch the zipper into place starting about 1in down from the pull tab. When you reach the  opposite side of  where you started stop and slide the pull tab down and behind the zipper foot. To do this leave  the needle in the down position and lift the foot so as to not lose your place. Once you have the pull tab behind the zipper foot release the foot and finish stitching.
 
Open the zipper place front and back pieces right sides together stitch the other three sides to complete the cushion cover. Turn right side out stuff with cushion pad and enjoy.

Friday, June 27, 2014

Cushion Covers

I started working on  new cushion covers this week from some remnant fabric that I had purchased months ago. They are not finished because the warm weather is taking me into the garden, watching it grow. We also went fruit picking last weekend, came home with strawberries, raspberries and peaches.

Friday, May 23, 2014

Simple Bolster Cushion


Bolster cushions are super easy to make. A bolster nestled by your sofas armrest adds a decorative touch and extra comfort. For more interest add piping to the seams in step 3.


Materials
20’ fabric
50” ribbon
14” square cushion insert


Instruction

1.       Cut one 13 x 19 in rectangle, cut two 3 x 19 in rectangles

2.       Zigzag 19 in side on all pieces.

3.        Pin and stitch the narrow rectangles on either side of the wider rectangles. Seam allowance is ½ in. Remove pins as you stitch.  Zig zag edges. You should now have a 19 in square.
 
4.       Open and press seams flat. Zig zag all edges.

5.       Fold the square in half right sides together with the narrow rectangles on the ends. Making sure the seams meet.


6.        Pin and stitch 1 in in from the edge to form a tube.

7.       Open and iron the seam flat

8.       To make the casing turn the edge over twice ½ in each time. Iron to keep in place and stitch around the circumference. If your machine has a removable extension piece remove it while stitching the casing. It makes it so much easier.


9.       To thread the ribbon through the casing channel pin one end of the ribbon to a safety pin and enter through one gap and slowly work the pin all around and emerge through the other gap. Repeat on the other end.  Turn cover right side out.


10.       To inset the square cushion roll it up and slowly pull the cover over the cushion. Once the cushion cover is in place pull the ribbon to gather the sides and tie a bow.
 

Saturday, May 17, 2014

Seahorse Cushion

 
I think  seahorses are fascinating. This cushion has three resting on a lovely linen blend fabric.
This week I opened an Etsy shop. Something I had been thinking about for a long time. Please stop by and take a look. Just click on the link on the sidebar.

Seahorse Cushion with Pleated Trim

Materials

½ yard linen blend fabric
15 x 24 in printed fabric
Zipper
Cushion insert
Fusible web (wonder under)
Seahorse template

Instructions

1 Cut two  12x 16 rectangles from solid fabric, cut two  4 x 24in strips from printed fabric, cut one 7 x 10 in rectangle from printed fabric for seahorses.
2 Iron the wrong side of the seahorse fabric to the rough side of the fusible web (or follow product instructions). Trace the seahorse template onto the paper side of the fusible web 3 times and cut out.
3 To position the seahorses on the cushion front, firstly fold the cushion front into thirds along the long side. Place pins at the folds. Unfold the cushion front and place the first and last seahorse on the folds and the centre seahorse will sit between them. There will be about 3 ½ in on the top and bottom edges of the cushion front and the seahorses.
 
4 Remove backing paper and iron seahorses onto the cushion front. Top stitch the outline of each sea horse.

5 Fold the strips in half wrong sides together on the short side and iron to keep the fold. Open and fold the other way so right sides are together and stitch the shorts sides. Turn right side out.
 
6 Measure 1 in intervals along the raw edge. Fold starting from the right hand side the second to last mark to meet the last mark. Pin to hold in place. Repeat until you get to the end. In the photo the pink pin will fold to meet the red pin.


When pleated the strip should measure about 11 ½ in. Machine stitch to hold the pleats. Remove pins as you stitch.
 7 Attach pleats to short sides of the cushion front. Place pleats about ½ in from the edges on the top and bottom. Pin and stitch. Remove pins as you stitch.
8 Align the front and back pieces together right sides facing. Measure the zipper length a long the bottom long side and stitch the seam either side of the zipper. Make the seam allowance about ¾ of an inch. Make sure the pleats are not caught in the seam. It’s a good idea to zigzag the edges of the sipper seam at this stage.
 
9 Working from the wrong side of the cushion pieces iron the seam flat. Place the right side of the zipper face down in the middle of the seam. Tack and stitch one side of the zipper to one seam allowance only using the zipper foot. Start at the bottom end and stitch towards the top when you are about 2 ins from the top leave the needle in the fabric, lift the zipper foot and pull the zipper open until the zipper tab is behind the zipper foot release the foot and continue to stitch.
10 Turn the cushion over to the right side. Tack and top stitch the other side of the zipper in place starting at the bottom and working up and again opening the zipper as you get to the top.

11 Partly open the zipper. Align the edges of the front and back pieces right sides together with the pleats sandwiched between the front and back. Stitch around the edges of the three remaining sides to finish the cushion
12 Zigzag edges. Turn right side out and insert cushion.
 

Friday, May 09, 2014

Gathered Cushion Cover


Finished size 31x33cm

Materials
90cm cotton fabric
Matching thread
Cushion insert 36x36cm
160cm cord


Instructions

1 For the front cut two 13x37cm strips and one 13x72cm strip. For the back cut one 30x35 cm piece and one 17x35cm piece.

2 Zigzag down the length of the 72cm strip encasing an 80cm cord. Repeat on the other side.
 
3 To gather the fabric hold the cord in one hand and push the fabric towards the centre. When gathered it should be the same length as the other two pieces.


4 With right sides together stitch the three strips of fabric to form a rectangle, with the gathered piece in the middle.


5 Unpick the zigzag stitch and remove the cord. The easiest way is with a seam ripper.

6 On the right side of the fabric top stitch down the length of the seams. The front piece is now finished.
7 For the back pieces fold one long side ( 35cm)of each piece under 1cm press and fold under again  1 cm and hem.
8 Place the back pieces on the work surface right side up. They will overlay by about 5cms. Lay the front piece on top right side down. Pin the front and back pieces together and stitch around the rectangles perimeter. Remove pins as you stitch.
 
9 Zigzag edges to minimize fabric fraying. Turn right side out and insert cushion

Friday, May 02, 2014

Basic Cushion cover with a zip


Finished size: 41 X41cm
Fabric name: Lisette 2012

Materials
Fabric 50cm
Matching thread
Zipper 30cm (12in)
Insert 41 X 41 cm
 

Instructions

1 cut two squares 42 X 42 cm
2 zig zag all edges of both squares to minimize fraying

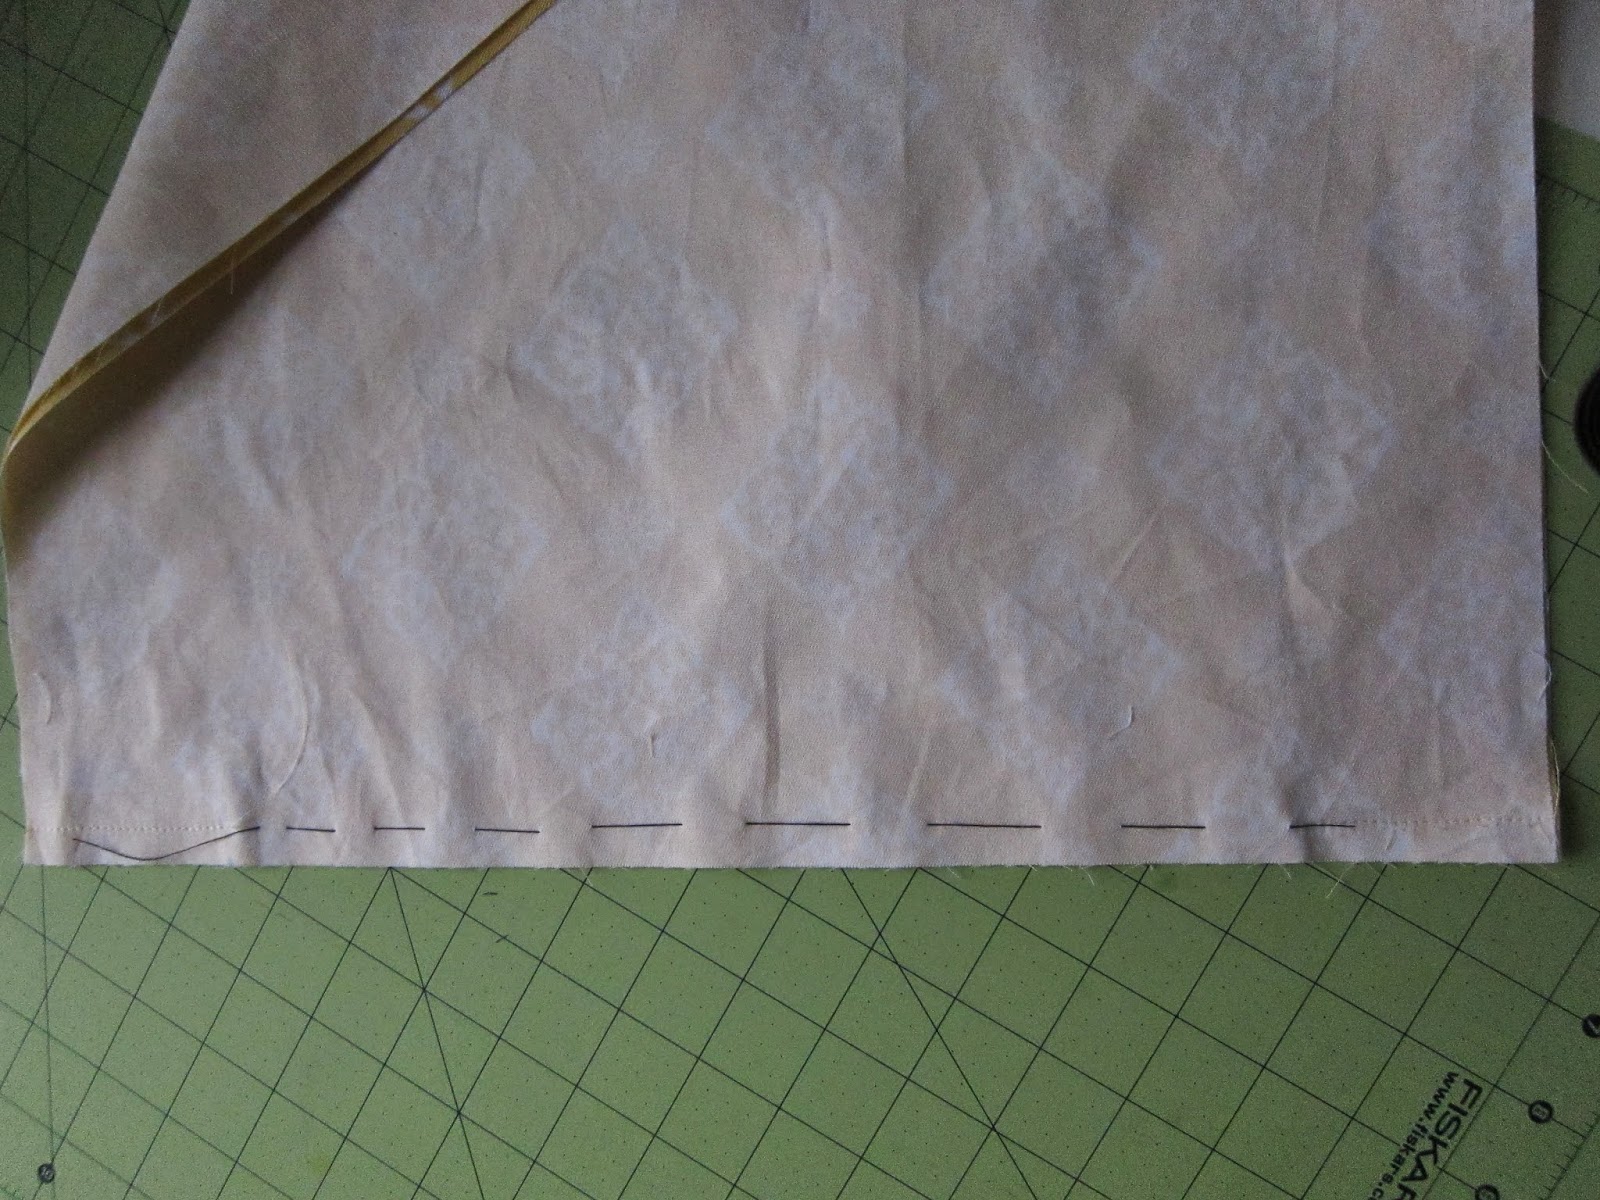
3 place the squares right sides together on your work table lay the zipper on one edge and mark where it starts and ends. Pin and stitch the seam using a 1 cm seam allowance. Leave the zip opening unstitched.
 
 Hand tack the zip opening closed along the seam line. Iron the seam allowance open. (Black thread was used for the photo)

4 place the zip within the tacked section of the opened seam right side down. Position the zip slightly off centre so the zip teeth sit on one seam allowance only. Pin in place and tack.


5 using the zipper foot on a sewing machine place the fabric right side up and stitch the zipper in place to form a rectangle around the zipper. Remove tacked threads.
6 partly open zipper. Line up the two squares right sides together. Pin and stitch up the other three sides.


7 clip corners and turn right side out. Insert cushion.


Friday, April 25, 2014

Simple Cshion Cover with Opening

I adore the print on this cotton fabric. Its fresh and all the butterflies remind me of warmer days. For this cushion I wanted to highlight the larger tree with the flower on the right. therefore a little  fabric was sacrificed to make this possible. This cushion cover is easy to make and it has an opening which I like because unlike the basic cushion from my last post its easy to remove for laundering.

Materials
50cm of fabric if using a solid more if its patterned.
matching thread
cushion insert

Instructions
1Cut fabric, one piece for the front 42cm X 42cm. Two pieces for the back 25cm X 42cm.
2 Starting with the back pieces fold one long side under 1cm press flat, repeat and iron to create the hem. Stitch down its length. Repeat with the other back piece.
3 Lay the  back pieces on your worktable with right sides up. overlap the two pieces to form a 42cm square. The hemmed sides should be facing the middle. The overlap will be approximately 10cm
4 Place front piece on top of overlapped back pieces  right sides together. pin together to prevent sliding during sewing. Stitch around the entire perimeter of the square. Trim corners zig zag edges to prevent fraying.
5 Turn right side out. Insert cushion

Wednesday, April 02, 2014

Basic Cushion Cover


The Square
finished project 36cm ( 14in)

Materials Needed
furnishing fabric approximately 40cm (16in)
Matching thread
cushion pad 36cm (14in) square
Instructions
1 Cut two 38cm (15in) squares. Most furnishing fabrics will indicate on the selvedge which way a pattern runs. its  a good idea to cut and stitch both pieces running the same way. I placed a pin to help me remember which way is up.
2 (this step is optional) Looking  at my fabric I felt it needed a pop of colour so I satin stitched the centres of some of the flowers with neon yellow embroidery thread.
3 Place fabric right sides together, pin to prevent slipping during sewing. Lightly mark the opening with tailor's chalk on one side about 18cm (7in) long.
4 Stitch around the perimeter 1 cm in from the edge. remove pins as you stitch. Back stitch start and finish to reinforce stitch. Zig-zag edge to prevent fraying.
To help me sew straight I keep the needle in the centre position on my machine and line up the fabric with the edge of the all-purpose foot. This does two things it gives a seam of about 1cm and a straight line.
 
 
5 Turn right side out, gently poke out corners with a chopstick. Insert pillow pad and slip stitch opening closed.
(if your pillow form has a zipper closure, open it and gently ease some stuffing into the corners for some nice corners.)


Friday, September 20, 2013

remnants cannot be returned


I love searching through the remnant bins, its a treasure trove of beautiful fabric that no one wants because its not enough. Even the store does not want it anymore, that's why the tag states 'remnants cannot be returned'. Well what do you do with say 30cm of fabric? I make cushions. They cost only a few dollars, and if say after a month or a week  I get tired of the new cushions no big deal, back to the remnant bins I go. There is always some new waiting for me.

Tuesday, January 29, 2013

Cushion

This simple to make cushion was inspired by one that i saw in a Pottery Barn catalog. The fabric is 'Cashmere' by Waverly.
To make one 13'' cushion:
Cut one 14inch square and two rectangles measuring 14x10. All seams are included. Turn under one long side of each rectangle twice and stitch to create hem. Over lap hemmed rectangles to create a 14 inch square and pin or stitch to hold together. The hemmed sides need to be in the centre of the square as this is the opening to insert pillow form. Layer the two square right sides together and stitch around all four sides. Trim corners, turn out to right side and stitch again around all four sides to create the border. insert pillow form. That's it, i told you it was simple.